Saturday, April 8, 2017

Pomegranate Jelly


As part of the Food In Jars Mastery Challenge, I was enticed to make Pomegranate Jelly.  April's challenge is quick pickles and March's was Jelly and since I didn't get around to making Pomegranate jelly I thought better late than never!? Boy was I right because Pomegranate Jelly is my new favorite jelly. It is just SO good!

Ingredients
5 Cups Pomegranate Juice - I used Poms


5 Cups Sugar
2 3.5 oz. Boxes regular, powdered pectin (I used the pectin below - be careful to read the directions - it uses Teaspoons NOT Tablespoons)


Process
1. Prepare you hot water bath canner with your jars. Expect  roughly 6+ cups of jelly. Place lids and rims in a saucepan with hot water and heat.


2. In large pot bring the juice to a boil.


3. Once boiling, sprinkle in the pectin whisk quickly. Add pectin slowly or it  will clump.


4. Bring to a boil once again. When the juice mixture boils again, slowly whisk in the sugar to avoid clumping and temperature dropping

5. Once all of the sugar is added and whisked in, bring the mixture to a full rolling boil  let it boil for 1 minute. This is where the large pot is necessary as the level will rise as the juice foams.


6. After you let it have a good rolling boil,  turn off the heat, let it settle. Test to see if it has gelled enough using a cold spoon.

7. Skim off any foam.

8. Fill hot jars with jelly, leaving 1/4″ head space. Using a damp paper towel, wipe any residue off the rims. Place hot lids and tighten rings onto jars.

9. Process in a boiling hot water bath for 10 minutes. Remove and check out that color!


This beautiful jelly is a welcome addition to this homestead kitchen!


CHRISTMAS PRESENTS TO BOOT!

Friday, April 7, 2017

Matzo Spanakopita

This recipe from Food 52 was slightly fussy in the way it was written. I will rewrite it this weekend because it really should be doubled. It is filling and tasty and I highly recommend it.

Matzo Spanakopita

Serves 4 to 6

For the sauce:
  •   8 TB (1/2 stick) unsalted butter
  •   4 TB potato starch(or substitute corn starch)
  •   4cups whole milk
  • 1 cup grated Parmesan cheese
  • 1/2 teaspoon grated nutmeg
  •   2 teaspoon kosher salt
For the spanakopita:
  •   6 tablespoons extra-virgin olive oil, divided
  •   2 cup sliced shallots
  •   2 garlic clove, thinly sliced
  •   2 pound fresh spinach  
  • Kosher salt and freshly ground black pepper
  •   6 large eggs
  •   2 teaspoon grated lemon zest (from 1 lemon)
  • 1 box matzo
  • 1 cup grated Parmesan cheese
  •   1 & 1/2 cup crumbled feta cheese
  • 1 cup pine nuts, toasted
  1. To make the sauce, melt the butter in a small pot over medium heat. Whisk in the potato starch. Slowly pour in the milk and bring to a simmer, whisking continuously to prevent the sauce from becoming lumpy and sticking to the bottom of the pot. Simmer until the milk has thickened and the starchy flavor has cooked out, 3 minutes. Remove the pan from the heat.
  2. Whisk the Parmesan cheese, nutmeg, and salt into the sauce. Transfer to a small heatproof bowl, cover with a piece of plastic wrap directly on the surface to prevent a skin from forming, and refrigerate until fully cooled, about 20 minutes.
  3. Preheat the oven to 400° F. Line a colander with a clean kitchen towel and set in the sink. Brush a 9x13 baking dish with 2 tablespoon of the olive oil.
  4. Heat the remaining 4 tablespoons olive oil in a large pot over medium-low heat. When it begins to shimmer, add the shallots and garlic and cook until soft and translucent, 5 minutes. Add the spinach, season with salt and pepper, and cover. Cook the spinach, stirring occasionally, until wilted, 6 minutes. Pour the vegetable mixture into the colander and use the kitchen towel to squeeze out as much moisture as possible. Set aside to cool.
  5. Remove the cooled sauce from the refrigerator and whisk in the eggs. Stir the lemon zest into the spinach mixture. Make a payer matzo in the bottom of the prepared baking dish. Cover with 1 cup sauce, then spread 2 cup of the spinach mixture over the sauce. Sprinkle with 2 tablespoon of the Parmesan, 6 tablespoons of the feta, and 6 tablespoons of the pine nuts. Place another sheet of matzo on top, pressing down gently. Repeat the layers, then cover the final sheet of matzo with the remaining sauce, Parmesan, and feta.
  6. Transfer to the oven and bake until the feta on top turns golden brown, the sauce puffs up, and the matzo softens, 30 to 35 minutes. Remove and allow the pie to rest for 10 minutes before slicing.

Thursday, April 6, 2017

Pickled Eggs for Easter!

I made Pickled Eggs as part of the Food In Jars Mastery Challenge for the month of April. I used the recipe below, which is from The Incredible Egg, using the juice from two jars of pickled beets. The Incredible Egg called for canned beets (not pickled) but SP can not stand canned beets. The only jarred ones we could find were pickled, so without an alternative,  here goes nothing! Regardless, the eggs will  be beautiful and a wonderful addition to the Easter Table.  If they smell at all like his horrible childhood memory,  I will devil them and he will never know!

http://www.incredibleegg.org/recipe/pickled-eggs/

Ingredients
I  16 oz. jar beets
1 & 3/4 cups white vinegar
I cup sugar
1 & 1/2 TB whole allspice
1 stick cinnamon, halved (oops - missed that step)
8 Hard-boiled eggs, peeled

Process
1. Hard boil eggs.

2. Drain the beets, reserving the juice. Put the beets away in the fridge and use in a salad later.

3. In a medium sauce pan over medium high heat, combine the beet juice, vinegar, sugar and spices. Bring to a boil.


4. Reduce heat and simmer five minutes.

5. Peel the eggs and put in a 1 quart canning jar with a lid.


6. When finished simmering, pour the hot marinade over the eggs.
7. Cover tightly and allow to cool to room temperature for at least 1 hour.


8. Place in refrigerator and allow flavors to blend. This can be for several hours or up to a week. (mine will be there for a week and 3 days before eating).


Sunday, March 26, 2017

Kartoffel-Bacon-Tarte AKA Bacon Pie


I can't translate German but this video is fairly strait forward.
It says I can embed which I will try above, if not below is the Youtube link.
https://youtu.be/nwyh31pOjgs
The recipe is posted here:
 http://www.leckerschmecker.me/im-knuspermantel/

You can't make this s**t up and it was well deserved after a long day boiling syrup outside, even if that meant that we didn't eat until 10:30.  I rallied against it because it looked like a risk and it would take about 3 hours between the trip to town and the 2.5 hour cooking time. Nonetheless, they persisted and we had it for dinner.

It's fairly straight forward.

Ingredients
 Large cast iron pot
Two or more packages of bacon
2 lb white potatoes
1 lb shredded cheese
salt and pepper

Process

 1. Preheat the oven to 375 degrees.
2. Lay out the bacon as showed in the video. You want half the strip in and half the strip out.
3. Place a layer of sliced potatoes.


4. Season with salt and pepper.
5. Cover with a layer of cheese.
6. Repeat steps 3 and 4, with a little pepper (no more salt) one more time.
7. Fold the bacon strips over the top of the pie.


8. Bake in oven uncovered for 2.5 hours.


9. Let cool a bit and then serve. You may want to pat with a paper towel to absorb some of the excess fat and grease.


10. Eat with some fresh vegetables. Cover your head in a napkin and hide from God as you eat such a sinful meal. Thank you Anthony Bourdain for allowing us a way to escape the embarrassment of our gluttony.


Tuesday, March 21, 2017

Preservation Pasta Party


 Friends gathered on the porch to witness the final sunset of winter while enjoying my recently made Shrubs. On a warm March afternoon, the mocktails were refreshing and healthy - made with seltzer and sparkling lemonade and our Blood Orange shrub (above) and Blueberry Ginger shrub (below).


SP and I were busy bustling in and out, making the pasta dough or  turning the salt preserved lemons into viniagrette. In other moments I was making a red sauce, prepping garlic bread, and then turning to make an Alfredo. Finally I got to put the salad together. 
The salad dressing was much saltier than I wanted, but it is absolutely PERFECT over beets. The two compliment each other perfectly.  I will be buying beets this week to use the rest of the dressing on. 

The best part of the night, was having everyone gather in the dining room to all help rolling out the dough and making it into pasta. This time the pasta making went much more smoothly.
There was the boys side of the table:


And a the ladies side of the table:


Finally it was time to turn the pasta sheets into fettuccine. 


We probably should have let them hang a little longer before bunching them up as  a bunch or two were a bit too sticky to unwind and go into the water. 


Below is the piece d'resistance! Was the freshly made pasta with salt preserved egg yolk grated over the top. Yummy salty treat!

Sunday, March 19, 2017

Preserved Lemon Vinaigrette and other ideas


Sorry for the blurry photo but I was rushing to get dinner on the table while the pasta finished cooking. I made Marisa's viniagrette below and put it over this wonderful soft salad made of red leaf lettuce, cut orange tomatoes, avocado, and yummy Love beets.

I am posting some recipes here to save them in advance of tonight's homemade pasta party. Tonight we will be celebrating the completion of the lemons as well as my salt preserved eggs!

I will add some pictures after the party.
From Epicurious:
Ingredients

  • 1 tablespoon minced preserved lemon
  • 6 tablespoons extra-virgin olive oil
  • 2 tablespoons lemon juice
  • 1/4 teaspoon red pepper flakes
  • 1 sprig fresh thyme, leaves finely chopped
  • 1 pinch salt
 Or this Vinaigrette from Food 52: (from a sweet recipe for watermelon and feta salad- https://food52.com/recipes/37110-watermelon-with-preserved-lemon-vinaigrette)
  • Rind of half of a preserved lemon, rinsed and finely diced (about 2 tablespoons in total)
  • 2 teaspoons fresh lemon juice, or to taste
  • 5 tablespoons of your favorite extra-virgin olive oil
Or this Preserved Lemon Aioli from Food 52

But I think the direction I will take is from Marisa's post on Food in Jars : http://foodinjars.com/2013/01/preserves-in-action-pureed-preserved-lemons/

To quote Marisa: "
The best thing about blending the lemons is that once you’ve scraped what you can out of the blender pitcher, you’re already halfway to a great salad dressing. Because it’s inevitable that you won’t be able to get every last bit out of the blender. Instead of surrendering and cleaning it out in the sink, add a little water, honey, and freshly ground pepper. Put the pitcher back on the blender base, run the motor on low and drizzle in a little olive oil. As soon as it develops a thick consistency, you’re done.
The finished dressing is creamy and tart, but without the throat-catching acidity that a vinegar-based dressing can have. I made a not-so-seasonal salad of halved grape tomatoes and avocado, covered it with my blender dressing and heaped it on a pile of torn lettuce. It made for a really great weekday lunch."

Friday, March 17, 2017

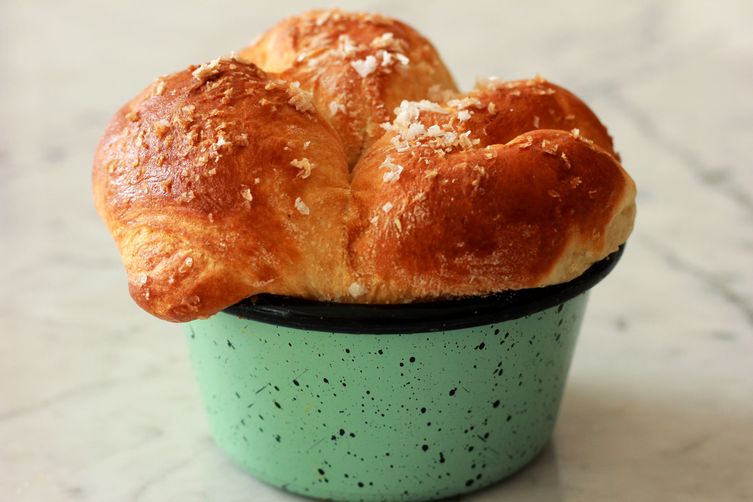
Milk Bread


Kindred's Milk Bread 
I have been drooling over this recipe that I received in my email from Food 52. I am not able to get to it today, but I might try my hand at this tomorrow in preparation for the pasta night we are having on Sunday. It looks and sounds wonderful!


The original recipe can be found here: 
Kindred's Milk Bread


Makes 6 rolls, two 9- by 5-inch loaves, or 12 split-top buns

Ingredients

5 1/3 cups bread flour, divided, plus more for surface (Kindred uses King Arthur)
1 cup heavy cream
1/3 cup mild honey (such as wildflower or alfalfa)
3 tablespoons nonfat dry milk powder (such as Alba)
2 tablespoons active dry yeast (from about 3 envelopes)
2 tablespoons kosher salt
3 large eggs, divided
4 tablespoons (1/2 stick) unsalted butter, cut into pieces, at room temperature
Nonstick vegetable oil spray
Flaky sea salt (optional, but shouldn't be) 
 
Process 
  1. Cook 1/3 cup flour and 1 cup water in a small saucepan over medium heat, whisking constantly, until a thick paste forms (almost like a roux but looser), about 5 minutes. 
  2. Add cream and honey and cook, whisking to blend, until honey dissolves.
  3. Transfer mixture to the bowl of a stand mixer fitted with a dough hook and add milk powder, yeast, kosher salt, 2 eggs, and 5 remaining cups flour. 
  4. Knead on medium speed until dough is smooth, about 5 minutes. Add butter, a piece at a time, fully incorporating into dough before adding the next piece, until dough is smooth, shiny, and elastic, about 4 minutes.

  5. Coat a large bowl with nonstick spray and transfer dough to bowl, turning to coat. 
  6. Cover with plastic wrap and let rise in a warm, draft-free place until doubled in size, about 1 hour.
  7. If making rolls, lightly coat a 6-cup jumbo muffin pan with nonstick spray. Turn out dough onto a floured surface and divide into 6 pieces. Divide each piece into 4 smaller pieces (you should have 24 total). They don’t need to be exact; just eyeball it. Place 4 pieces of dough side-by-side in each muffin cup.
 
  8.  If making loaves, lightly coat two 9- by 5-inch loaf pans with nonstick spray. Turn out dough onto a floured surface and divide into 12 pieces. Nestle pieces side-by-side to create 2 rows down length of each pan.
 
  9. If making split-top buns, lightly coat two 9- by 13-inch baking dishes with nonstick spray. Divide dough into 12 pieces and shape each into a 4-inch long log. Place 6 logs in a row down length of each dish.
  10. Let shaped dough rise in a warm, draft-free place until doubled in size (dough should be just puffing over top of pan), about 1 hour.
  11. Preheat oven to 375° F. 
  12. Beat remaining egg with 1 teaspoon. water in a small bowl to blend. 
  13. Brush top of dough with egg wash and sprinkle with sea salt, if desired. 
  14. Bake, rotating pan halfway through, until bread is deep golden brown, starting to pull away from the sides of the pan, and is baked through, 25 to 35 minutes for rolls, 50 to 60 minutes for loaf, or 30 to 40 minutes for buns. 
  15. If making buns, slice each bun down the middle deep enough to create a split-top. Let milk bread cool slightly in pan on a wire rack before turning out; let cool completely.

Tuesday, March 14, 2017

Blueberry Ginger Shrub

As part of the March Food in Jars Challenge, I made another shrub inspired by my desire to kick my immune system back into high gear. I thought the medicinal ginger and the antioxidant blueberries were quite the touch. I used Marisa's Blueberry Ginger Shrub recipe from Food in Jars and doubled it. If you do attempt this and double it, don't muddle in the quart jars as there just isn't enough room to move around, so use a 4 cup measuring cup before pouring it into the mason jar.

Ingredients (for a single recipe)
One heaping cup of blueberries
3/4 cup sugar
One cup unfiltered Apple Cider Vinegar (I use Bragg's)
2 inch piece of ginger, peeled

Process
1. Put blueberries in a mason jar and cover with the sugar.
2. Using a muddler or a pestle, mash the blueberries and sugar together and smash into a sweet pukpy mess. The more mess the merrier.
3. Add the vinegar to the jar and stir it all together, vigorously.
4. Grate the ginger over the mess in the jar.
5. Put a lid over the jar and give it a good shake. Dance around the kitchen with it for little while if it makes you smile. The shrub will love the entertainment.


6. Put your shrub in the fridge and let it hang out with it's friends for a few days. Here's mine with the Blood Orange Shrub and neighbors Salt Preserved Lemons. (darn A-1 trying to get its moment in the spotlight).


7. Day two or three, strain the Shrub.


8. Return to a covered mason jar and place in fridge. Use as a mixer in drink of your choice. Here's one recipe I found: http://www.saveur.com/carolina-blueberry-shrub-cocktail-recipe