Monday, November 17, 2014

Shumai

Shumai are open-topped dumpling,s stuffed with tasty ground meat and vegetable filling, then steamed. Tonight I will be making these with the first batch  of our own ground pork. I will likely close them and give them a quick pan sear for a seal and extra flavor before steaming. 


Ingredients
1 pound ground chicken (or pork)
1/4 cup unsweetened coconut milk
1/4 cup coarsely shredded carrot
2 Thai chilis, minced
2 Tablespoons chopped basil
2 Tablespoons Asian fish sauce
2 Tablespoons sugar
2 teaspoons fresh lime juice
1 garlic clove, minced
1 large egg beaten
1 small shallot, minced
1/2 teaspoon minced fresh ginger
1/2 teaspoon kosher salt
1/4 teaspoon freshly ground pepper
40 wonton wrappers
Green leaf lettuce leaves for steaming
special equipment: bamboo steamers
Soy sauce and Sriracha chili sauce, for serving

Process

1. In large bowl, combine the ground chicken with the coconut milk, carrot, chiles, basil, fish sauce, sugar, lime juice, garlic, egg, shallot, ginger, salt and pepper. Using your hands mixed thoroughly.

2. Follow the directions on the wrappers, create your shumai dumplings in the wonton wrappers. Repeat with the remaining wonton wrappers and filling. 


3. Fill a wok or a very large skillet with 2 inches of water and bring to a boil.

4. Line a double tiered bamboo steamer with lettuce leaves and arrange the shumai in the steamer without crowding.

5. Cover and steam over moderate heat until cooked through, about 10 minutes.

6. Repeat with the remaining shumai. You may also choose to pan fry them for extra crisp after the steam or even skip the steam all together. Yummy versatile and great for the whole family!

Serve immediately with the sauces.

Shu Mai


It looks like this recipe MAY have originated from a Food and Wine magazine. I found a nearly identical recipe here: Chicken and Coconut Shumai

Monday, November 10, 2014

Cranberry Ginger Relish

Merry Meeting Menus: Cranberry Ginger Relish: This 2008 Martha Stewart recipe is a favorite I keep coming back to.

Ingredients

  • 1 bag (12 ounces) fresh or frozen cranberries
  • 1 cup sugar
  • 1 tablespoon grated fresh ginger
  • 2 tablespoons sherry vinegar or red-wine vinegar

Directions

  1. In a large saucepan, bring cranberries, sugar, ginger, and 2 tablespoons water to a boil. Reduce heat to medium-low, and simmer until most of the cranberries have popped, 10 to 15 minutes.
  2.  Stir in vinegar.
  3. Mash around with a potato masher to make it into a rough chutney. 
  4. Continue cooking until it looks consistent.
  5. Remove relish from heat. Let cool to room temperature, and serve.

*** you can also hot water can this in clean jars and warm lids, processing for 10 minutes ***

Wednesday, October 22, 2014

Earl Grey Kulfi thanks to Aarti Paarti


First and foremost, I need to give a bright and loud shout out to my favorite new Indian chef and Blogger Aarti Paarti!  She was a highlight for my latest Indian Dinner party and I have added her cookbook to my wish list for Christmas. Welcome to the ranks of Madjur Jaffrey on my shelf Aarti because you are my new favorite! Thank you for finding me! :)

So I stumbled upon this recipe when searching for Indian desserts and candies that I could make. The original recipe can be found here: Aarti Parti Earl Grey Kulfi Pops. 

I doubled the recipe and had enough to fill my popsicle racks as well as an additional bowl. This was perfect because I scooped the ice cream from the bowl for the dinner party  and fed the kids the popsicles. They loved it so much they are clamoring for me to make it again!

Earl Grey Kulfi Pops

Ingredients
1 12oz can evaporated milk 4 earl grey tea bags 1/2 tsp ground cardamom 1 14oz sweetened condensed milk 1 cup heavy (whipping) cream Handful of finely chopped pistachios

Directions
11.  Heat evaporated milk over medium heat until small bubbles form around the circumference of the pot. While it is heating, snip the tops of the tea bags. 

2. Once the milk is hot, whisk to make sure nothing is sticking to the bottom. 

3.  Turn the heat off, and add the contents of the tea bags. 

4.  Cover. Let it sit and steep for 30 minutes.

5. Strain the evaporated milk into a big bowl. 

6.  Add cardamom, condensed milk, heavy cream and pistachios. Whisk together. 

7.  Either pour into popsicle molds, small bowls or one large bowl (cover bowls with a piece of plastic wrap to avoid freezer burn and formation of a “skin”). Pop into the freezer overnight. 

8.  When you’re ready to serve, run the popsicle mold under hot water to loosen it.Let larger bowls thaw a bit on counter as it freezes very hard. 

Apricot Soda Bread


This was a REALLY yummy version of soda bread that makes a really nice breakfast bread. Will definitely make this one again.  The recipe is from Flavor the Moments and the recipe can be found HERE.


Ingredients
4 cups all purpose flour, plus extra for dried apricots
4 tablespoons sugar
1 teaspoon baking soda
1 1/2 teaspoons salt
4 tablespoons cold unsalted butter, cut into 1/2" dice
1 3/4 cup cold low fat buttermilk, shaken
1 egg
1 tablespoon orange zest
1 cup chopped dried apricots

Instructions
1. Preheat oven to 375 degrees. 
2. Line a baking sheet with parchment paper.
3. Add the dry ingredients to the bowl of a stand mixer fitted with the paddle attachment, or use your handheld electric mixer. Mix the dry ingredients on low speed. 
4. Add the butter and mix on low speed until the butter is completely mixed into the dry ingredients. Using a fork, beat the egg, buttermilk, and zest in a measuring cup. Turn the mixer on low speed, and slowly add the wet ingredients to the dry ingredients. Combine the dried apricots with one tablespoon of flour, then mix into the dough on low speed just until combined. The dough is VERY wet!
Pour the dough out onto a well floured surface and knead a few times until it's in the shape of a round loaf. Place on the prepared baking sheet. Using a serrated knife, cut a small "X" into the center. Bake 45-55 minutes or until a cake tester comes out clean. Cool on a wire rack.

Monday, May 19, 2014

Friendship Bread


Welcome to your blob. This sweet bread starter is kept on your kitchen counter and resembles pancake batter. DO NOT use any type of metal for mixing. DO NOT REFRIGERATE. If the bag fills with air, vent it and reseal the bag. It is normal for the batter to rise, bubble and ferment. Buy extra zip lock bags, and keep flour, sugar, and milk in stock. Prepare for day 10 with instant vanilla pudding and additional ingredients below. If you keep a starter for yourself you will be baking every 10 days (or so).

Day 1: Do nothing. This is either the day you received the batter (or go by date on the bag).

Day 2: Mush the bag. Squeeze, mash, roll the blob around. Have fun.

Day 3: Mush the bag. Repeat

Day 4: Mush the bag. Again.

Day 5: Mush the bag. Smile.

Day 6: Add 1.5 cup flour, 1.5 cup sugar, and 1.5 cup milk to the bag. Mush, mush, mush the bag. Mix it all together. Have kids help.

Day 7: Mush the bag. Hum a tune to your blob.

Day 8: Mush the bag. Do a little dance.

Day 9: Mush the bag. Sing a little song. Get down tonight.

Day 10: Follow instructions below.

1. Pour entire contents of bag into a large non-metallic bowl.

2. Add 1.5 cups flour, 1.5 cups sugar, and 1.5 cups milk. Mix.

3. In ziplock bags, measure out 4 separate 1 cup batters. Date the bags. These are starters, keep one for yourself, and you have three to give away.

4. Preheat the oven 350 degrees.

5. Grease and dust 2 glass loaf pans. A sweeter option, in place of flour, dust the pans with a mixture of 1/2 cup sugar and 1.5 tsp cinnamon.

6. To the remaining batter in the bowl add:
    3 eggs                         
    1.5 tsp baking powder
    1 cup oil (or 1/2 cup oil & 1/2 cup applesauce)  
    1 tsp. baking soda
    1/2 cup milk                       
    1/2 tsp salt
    1 cup sugar                       
    2 cups flour
    2 tsp. cinnamon                    
    1/2 tsp. vanilla extract
    I large box instant vanilla pudding

7. Optional additions which I recommend = a large handful of slivered almonds, a large handful shredded coconut, and a handful of raisins. Diced apple is also recommended, and I could see shredded carrot working as well.

8. Pour the batter evenly into the two pans. If dusting with sugar, sprinkle a little more over the top.


9. Bake for at least 50 minutes (or more), until a toothpick comes out clean. I find the bread quite moist so I bake it for more like 60 to 70 minutes.


Enjoy!
- Madeleine
http://merrymeetingmenu.blogspot.com/

Canellini Bean Salad with Avocado Dressing


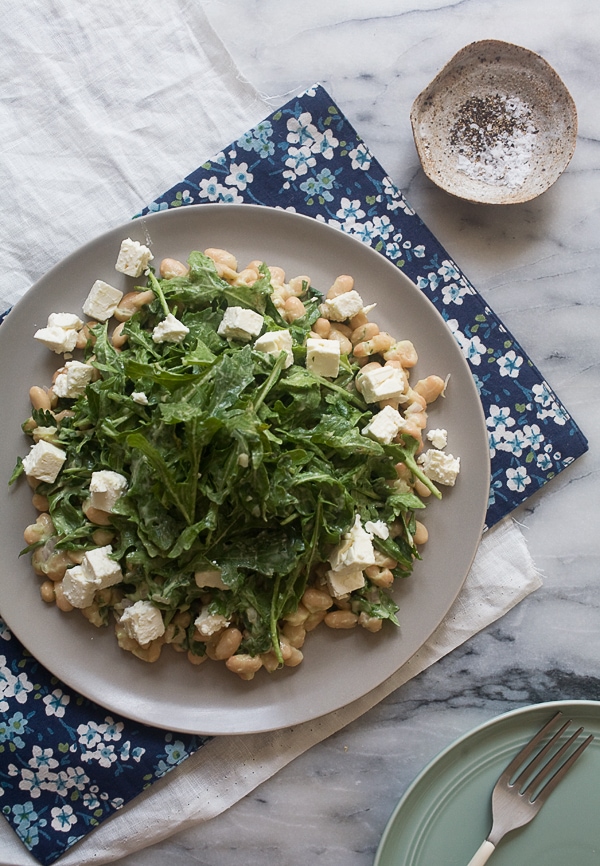
This was hands down the best salad I have made in a while, and the dressing is so good and healthy, I have made the salad at least three times in the past month. I found the recipe originally on Pinterest, but the owner of the recipe is the lovely and talended Cozy Kitchen. .The recipe can be found HERE. Honestly, their picture is also so much better than mine - neat and clean before it is tossed with the dressing.
Arugula Cannellini Salad with Avocado Dressing // www.acozykitchen.com
Ingredients

Salad:
3 cups arugula
1 (15-ounce) can of Cannelleni beans
3 tablespoons minced mint (about 5 leaves)
Small handful of Italian parsley (about 1/4 cup), roughly chopped
2 cloves of garlic, zested into the salad (using a Microplane is a good idea)
1 small shallot, minced
1/4 cup cubed feta (about 2 ounces)

Avocado Dressing:
1/2 large avocado (or one small avocado)
Salt
Pepper
1/4 cup olive oil
Juice from 1 to 2 lemons, divided (and depending on taste)

Process: 
1. In a medium bowl, toss all of the salad ingredients together, minus the feta (it’ll make a bit of a mess).
2. To a blender, add the avocado half, juice from 1 lemon and pinch of salt and pepper. Pulse a few times, until the avocado is broken up. With the blender going, pour in the olive oil until the mixture begins to thicken and become smooth. Add a few tablespoons (I ended up needing about 4 tablespoons) of warm water to help with the smooth texture. I let the blender run for about 1 minute to achieve the super smooth texture. If you’re ok with tartness (I think this salad needs it because of the beans) squeeze in the remaining lemon juice and adjust salt and pepper to taste. It may seem too tart right now, but I can assure you that when you toss it with the salad ingredients, it’ll be all good.
3. Add about half of the dressing and lightly toss the salad using your hands or a pair of tongs. Keep adding a bit of dressing as needed
4. Transfer to a serving plate, if you like, and top with the cubes of feta.
Serves 4 (as a salad appetizer)

Bacon Pancake Dippers

These were a genious idea for a yummy breakfast. For an awesome pancake batter recipe click HERE.

Greek Chicken Meatballs


 I made this for dinner last night and it was wonderful. The best part was watching the kids take heaping portions of the chopped cucumber. I love eating healthy family dinners all together at the table especially when we have friends over. This recipe is from RecipeChart.com and the recipe can be found HERE. I highly recommend!


Sunday, May 11, 2014

Tuesday, April 8, 2014

Coconut-Key Lime Squares


Coconut-Key Lime Squares

I made these yummy bars for dessert last night. Martha Stewart nailed it once again. They were yummy, quick and easy. I will definitely do these again and next time will consider doubling it!

Martha Stewart's Coconut-Key Lime Squares

Tuesday, November 26, 2013

Cranberry Ginger Relish


This 2008 Martha Stewart recipe is a favorite I keep coming back to. I've decided that I need to finally add it to my blog, since my goal is to un-clutter my life which may include culling collections of saved magazines. I return to this year after year and quadruple it for canning and the plethora of turkey and stuffing sandwiches that inevitably follow Thanksgiving. My one wish was that Hi-Ho was still alive to know that, after all these years, I am finally a cranberry sauce lover!

Ingredients

  • 1 bag (12 ounces) fresh or frozen cranberries
  • 1 cup sugar
  • 1 tablespoon grated fresh ginger
  • 2 tablespoons sherry vinegar or red-wine vinegar

Directions

  1. In a large saucepan, bring cranberries, sugar, ginger, and 2 tablespoons water to a boil. Reduce heat to medium-low, and simmer until most of the cranberries have popped, 10 to 15 minutes. Stir in vinegar.
  2. Remove relish from heat. Let cool to room temperature, and serve.

Petersen Pie crust

This is the pie crust used at the annual Pie Party.  I am making it today as I prepare for Thanksgiving!

Ingredients

2 and 1/2 cups flour

3 Tablespoons sugar

2 sticks butter, in pieces

1/4 cup ice water


Process


  1. In a large bowl, combine flour and sugar.

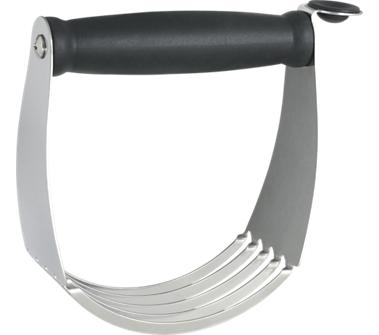
  2. Cut in butter, using a pastry blender (pictured).

  3. Sprinkle with water and continue mixing until smooth and the proper consistency.

  4. Divide into two balls and freeze 10 minutes.

  5. When ready, roll out on a well floured surface.

Friday, November 8, 2013

Apple Butter

This is my favorite apple butter recipe of all. It is from the book Preserving the Harvest. I have blogged about it before at this link.

Ingredients
10 large tart apples
2 cups apple cider
3-5 cups sugar
3/4 tsp. ground cloves
1/2 tsp ground all-spice
3 tsp. ground cinnamon
1/2 tsp. ground nutmeg

Process


1. Wash, core & quarter apples.

2. Combine apples and cider in oven safe pot on top of stove.

3. Cook slowly in cider until tender.


4. Blend in batches in the blender.


5. Return mixture to pot.
6. Add sugar and spices and stir to combine.
Place in oven.


7. Cook in 350°F oven, stirring often. Test for desired thickness by spooning mixture onto a cold plate. If no liquid oozes around edges, it is thick enough.
8. Ladle into jars. Process 10 minutes or freeze.

Beet Carrot soup with Feta cheese


Fresh Wild Turkey

The fall turkey season added food to the freezer and an amazing dinner to our table.


SP was quite ingenious in developing a way to prevent the gamey taste associated with some wild fowl.  Here's the recipe.
Ingredients
One wild turkey hen (approx. 7 lbs)
Bacon grease
16 oz can of hard cider (SP used Strongbow and it was perfect)

Directions
After cleaning and dressing turkey, rub the skin generously with bacon grease. Rub again with salt and pepper. Take a couple drinks of the 16 oz can of hard cider and then stuff it up the turkeys rear end. Place the bird upright in small lipped baking dish and place over indirect medium heat on your outdoor grill. Roast for about an hour until the internal temp reaches 165 degrees. Apply more bacon grease as necessary. When done, drain the accumulated grease from carcass and baking dish into a sauce pan. Reduce these contents over stove top to make a gravy.


Sunday, May 5, 2013

Cream of Bacon Soup


Sorry but I have no recipe and can not claim that I made it.
SP made the recipe up as an amalgamation of ones he found out and about, so you can just dream up your own!

Saturday, May 4, 2013

Zucchini zucchini zucchini :D

this looks like a fun way to use up the summer run on zucchini!

Pineapple Boats!


Creamy Roasted Tomato Balsamic Soup

This soup was amazing, fun, unique, loved, and a definite do it again! Thank you Tracey's Culinary adventures for another stellar recipe, pictured below with Smitten Kitchen's Cauliflower fritters. 


Tracey's recipe can be found HERE, but it originated from Cooking Light.

Creamy Roasted Tomato-Balsamic Soup
from Cooking Light, October 2005

1 cup low-sodium beef broth, divided
1 tablespoon light brown sugar
3 tablespoons balsamic vinegar
1 tablespoon low-sodium soy sauce
1 cup coarsely chopped onion
5 garlic cloves, peeled
2 (28-oz) cans whole tomatoes, drained
3/4 cup half-and-half
heavy cream, basil and freshly ground black pepper (optional garnishes)

Preheat oven to 500 F. Spray a 13x9 baking pan with nonstick cooking spray (I used a metal pan since I wasn't sure if Pyrex or other glass containers were safe to use at such high temperatures.)

In a measuring cup, whisk together 1/2 cup of the beef broth, the brown sugar, vinegar and soy sauce. Add the onion, garlic and tomatoes to the prepared pan then pour the broth mixture over them. Roast for 45-50 minutes, or until the vegetables are lightly browned (the liquid will have reduced and should be thickened).

Transfer the mixture in the pan to a blender or food processor. Add the remaining 1/2 cup of beef broth and the half-and-half. Process until smooth. At this point, you can go in one of two directions - eat the soup as is, or strain through a fine mesh strainer to remove the solids so the soup will have a smoother consistency. I strained it but it's up to you :) Garnish with a drizzle of cream, chopped basil and freshly ground black pepper, if desired.